Pre-cleaning assessment: evaluate your system condition
Determining contamination level
Before starting any cleaning procedure, assess the dirt level to select the appropriate cleaning method:
Light soiling (routine 3-6 month cleaning):
-
Fine dust evenly distributed across surface
-
Light water spots from dried rain
-
Scattered leaves and organic debris
-
Recommended approach:
Clear water rinse + gentle wiping
Moderate contamination (6-12 months without maintenance):
-
Visible dust accumulation in corners
-
Air pollution residue buildup
-
Sticky pollen deposits
-
Recommended approach:
Mild detergent wash + thorough rinsing
Heavy soiling (over 12 months neglected):
-
Hardened bird droppings
-
Moss or algae growth on frames
-
Industrial pollution film
-
Recommended approach:
Professional cleaning or advanced techniques
Assess your system's current condition and production impact using our
PVGIS24 solar calculator
, which analyzes the
20 key factors affecting photovoltaic performance
.
Essential equipment and safety gear
Safety equipment (MANDATORY)
For rooftop installations:
-
OSHA-compliant safety harness (ANSI Z359.11)
-
Temporary or permanent anchor points
-
Non-slip shoes with soft rubber soles
-
Chemical-resistant nitrile gloves
-
Safety glasses for splash protection
For ground-mounted systems:
-
Electrical hazard rated footwear
-
Insulated work gloves Class 0 (1000V rated)
-
UV protection eyewear
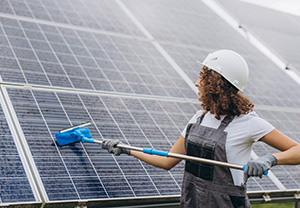
Professional cleaning equipment
Water and cleaning solutions:
-
Distilled water
(essential for spot-free finish)
-
pH-neutral detergent
specifically for solar panels
-
Budget alternative:
1 tablespoon dish soap per 2.5 gallons lukewarm water
Cleaning tools:
-
Telescoping pole
10-20 feet with articulating head
-
Soft-bristle brush
synthetic fibers only (never wire or abrasive)
-
Professional squeegee
12-14 inches with rubber blade
-
Lint-free microfiber cloths
high-absorbency rating
-
Low-pressure sprayer
maximum 30 PSI output
Water delivery system:
-
Garden hose with adjustable spray nozzle
-
Extension wand for hard-to-reach areas
-
5-gallon bucket for solution mixing
Advanced techniques for specific contamination
Hardened bird droppings removal
Challenge:
Acidic waste etches glass, extremely adhesive
Professional solution:
-
Saturate with warm water for softening
-
Allow 10+ minutes soaking time
-
Use plastic scraper at 45-degree angle
-
Rinse immediately after removal
-
Apply enzymatic cleaner if available
Tree sap and pollen deposits
Challenge:
Sticky substances trap additional particles
Effective method:
-
Mix warm water + 10% white vinegar
-
Spray solution and allow 5-minute contact
-
Circular scrubbing with soft brush
-
Immediate clear water rinse
-
Thorough drying to prevent streaking
Moss and algae on frames
Challenge:
Living organisms damaging aluminum components
Targeted approach:
-
Diluted bleach solution 1:10 ratio
-
Apply only to affected frame areas
-
Maximum 2-3 minutes contact time
-
Aggressive scrubbing with stiff brush on frames only
-
Immediate thorough rinsing
WARNING:
Never use bleach on photovoltaic cells.
Critical mistakes that cause permanent damage
Review our detailed guide on
7 critical cleaning errors to avoid
to prevent irreversible equipment damage.
Summary of costliest errors:
-
Cleaning overheated panels (>100°F surface temperature)
-
Using abrasive or acidic cleaning products
-
Excessive water pressure (>40 PSI)
-
Metal scraping tools or steel wool
-
Cleaning without proper electrical shutdown
Optimal cleaning frequency for your situation
Cleaning frequency varies significantly based on local environmental conditions. Our
climate-based maintenance schedule
provides precise timing for maximum efficiency gains.
General scheduling guidelines:
-
Urban environments:
every 2-3 months
-
Rural/agricultural areas:
4 times annually (seasonal)
-
Coastal locations:
every 6-8 weeks
-
Industrial zones:
every 4-6 weeks
When to hire certified professionals
Situations requiring expert technicians
-
High-risk installations:
-
Roof height exceeding 20 feet
-
Roof pitch steeper than 6:12 (26.5°)
-
Lack of proper safety equipment
-
Complex contamination issues:
-
Industrial chemical deposits
-
Visible component corrosion
-
Suspected electrical malfunctions
-
Warranty-critical systems:
-
Manufacturer certification requirements
-
Commercial installations >250kW
-
Systems with integrated power optimizers
Professional service cost:
$15-25 per panel depending on location and accessibility.
Performance monitoring and optimization
Measuring cleaning effectiveness
Quantify your cleaning impact precisely using our
performance gains ROI analysis
based on real US installation data.
Key performance indicators:
-
Pre/post cleaning energy output (kWh)
-
Open circuit voltage comparison (Voc)
-
Operating temperature differential
-
System availability percentage
Planning and tracking tools
Optimize your maintenance program with our professional-grade tools:
Conclusion: technical mastery for optimal performance
Professional solar panel cleaning requires proper methodology, appropriate equipment, and strict adherence to safety
protocols. When executed correctly, this preventive maintenance ensures:
-
Maximum system efficiency
throughout operational life
-
Complete warranty protection
for 20-25 year coverage
-
Total safety
during maintenance procedures
-
Extended equipment lifespan
through proper care
The performance difference between amateur and professional cleaning methods can represent 5-10% additional
efficiency over your system's lifetime.
Advanced FAQ: professional solar panel cleaning
Can I use a pressure washer on my solar panels?
Never exceed 40 PSI water pressure. High-pressure washing can damage weatherproof seals, cause water infiltration,
and create invisible microcracks. Use only adjustable low-pressure nozzles with wide spray patterns.
What's the best time of day for panel cleaning?
Early morning (6-9 AM) or late afternoon (5-7 PM) when panels are cool. Absolutely avoid midday (10 AM-4 PM) when
panels are hot. Thermal shock from cold water can crack tempered glass covers.
Should I clean panels on cloudy days?
Yes, cloudy conditions are actually ideal! Cool panels + ambient humidity aids cleaning + prevents rapid drying that
causes streaking. Avoid only during active precipitation or storms.
How do I clean panels with power optimizers or microinverters?
Exercise extreme caution around sealed electrical connections. Use only low-pressure water, avoid direct spray on
junction boxes. Verify all indicator lights function properly after complete drying and system restart.
Do I need to clean the back of bifacial solar panels?
Yes, bifacial panels generate electricity from both sides using reflected light. Clean both surfaces using identical
techniques. Standard monofacial panels require only front surface cleaning with annual back-side visual inspection.
What should I do if I discover cracks during cleaning?
Stop immediately, photograph all damage, isolate affected panel if possible. Contact your installer for warranty
claims or certified technician for assessment. Never restart system until complete professional inspection.